Basic Risotto

I love risotto.  Different kinds, different flavors, different things added… but nothing beats a basic risotto, the foundation that all “fancier” risottos start with.  There are different ways to make basic risotto, depending on the recipe and the chef, so whichever one you choose depends on your taste and simply what you like best.  I like to try different ones just to satisfy my curiosity.


Ingredients:

5 to 7 cups of tasty meat or vegetable stock
4 tablespoons extra virgin olive oil
2 cups (about 10 ounces) fairly fine chopped onion
I cup chopped shallots
1 teaspoon salt
2 cups short-grain Italian rice, Arborio or Canaroli
1 cup white wine
2 tablespoons butter
1½ cups freshly grated Grana Padano or Parmigiano-Reggiano cheese, plus more for the table
Freshly ground black pepper to taste


Pour the stock into a large pot, and bring it almost to a boil. Cover, and keep it hot over very low heat, on a burner close to the risotto pan.

Put the oil, onions, shallots, and half of the salt in a large pan, and set over medium heat. Cook the onions slowly, stirring frequently with a wooden spoon, as they sweat, soften, and gradually take on a golden color, 8 to 10 minutes.

Ladle ½ cup of the hot stock into the onions, stir well, and continue to cook over low to medium heat for another 5 to 10 minutes, by which time the onions should be completely golden nd glistening and the stock will have evaporated.

When the onions are completely devoid of stock, add the rice all at once, raise the heat to medium, and stir constantly. Cook for about 3 minutes, until the rice grains have been toasted, but do not allow them to scorch or color.

Pour in the wine all at once, and cook with the rice for 2 to 3 minutes over medium heat. Stir constantly all around the pan until the liquid has been absorbed. Have the hot stock close by, and be ready to add it with a ladle or measuring cup.

For the first addition, ladle in 1½ to 2 cups of the very hot stock, enough to barely cover the ride; stir it in continuously, all around the pan. Add remaining ½ teaspoon of salt, and stir well. As the initial portion of stock absorbs, slowly add a ladle or two of the hot stock and stir continuously to make sure the rice cooks evenly. Repeat this process until you’ve added at least 5 cups of the very hot chicken stock. Lower the heat, if necessary, to maintain a very gentle perking.

After the addition of at least 5 cups of stock, you can taste and gauge the degree of doneness of the rice kernels and the fluidity of the creamy suspension. Whenever you find the rice grains pleasantly al dente and the risotto creamy, you can choose to stop cooking. Or you may incorporate more stock, up to about 7 cups total, if you want a softer, looser risotto. When you are satisfied, turn off the heat.

Stir frequently at first, and then constantly as the risotto thickens. Make sure the spoon is reaching into all the corners of the pan, so everything is constantly being stirred. When all the stock has been absorbed, the risotto is harder to stir (the bubbling sounds thicker, too), and the pan bottom is visible, ladle in another cup of stock. (If you are flavoring your risotto with a sauce, stir it in t this point.) Keep track of how much liquid you have added.

Remove from heat, and stir in the butter. Stir in grated cheese and freshly ground pepper to taste, whisking with a wooden spoon. When it’s nice and creamy, serve the risotto immediately in heated bowls, with more grated cheese at the table.

Chicken in Lemon Sauce

It’s no secret that I’m a chicken fan. I can eat chicken every day. Well… most days. But because I like it so much, I also like to look for different ways to enjoy a favorite. This one is a winner! And the whole family loved it which means this dish will enjoy a repeat performance at our house.

Some minor customizations I made were to use my own mix of breadcrumbs which is simple… 4C Seasoned Breadcrumbs, some parmigiano to taste (but not so much that it’s overwhelming), and panko breadcrumbs to give it a little extra texture and crunch. I also followed the recipe and used olive oil to fry them which gives them a gorgeous golden color, but more often than not I use peanut oil for frying because it’s cleaner and burns less than vegetable or corn oil. I also made two pounds of cutlets so I doubled the recipe to make sure there was enough sauce for the cutlets.


Ingredients:

All-purpose flour, for dredging
Salt and black pepper, to taste
1 cup (180 g) plain bread crumbs
1 tablespoon (8 g) grated Parmigiano-Reggiano cheese
2 eggs, beaten
1 pound (454 g) chicken cutlets, thinly sliced
Olive oil, for frying (or any frying oil you’d like)
Butter, for greasing
1 cup (235 ml) chicken broth
½ cup (120 ml) dry white wine, such a Pinot Grigio, or Sauvingnon Blanc
Juice of 1 lemon


  1. Spread the flour in a shallow dish and season with salt and pepper
  2. In another shallow dish, combine the bread crumbs and cheese
  3. Add the beaten eggs to a shallow bowl and place the 3 bowls next to each other
  4. Dredge each of the cutlets in the flour, then dip into the egg, and finally coat in the bread crumbs. Transfer to a plate.
  5. Heat the frying oil, about 1½ inches (4 cm), in a large heavy-bottomed skillet over medium-high heat. Fry the cutlets until golden brown on both sides, 1 to 2 minutes per side.
  6. Preheat the oven to 350°F (175°C), Butter a 13 x 9-inch (33 x 23 cm) baking pan and arrange cutlets in the pan.
    (It’s okay to stack them over each other if you’re making more than the designated pound the recipe calls for.)
  7. Pour the chicken broth, wine, and lemon juice into the pan. Cover with aluminum foil and bake for 10 minutes. Uncover and flip the cutlets over, exposing the moist side. Bake uncovered for an additional 10 minutes. Spoon the pan sauce over the top and serve.

Crab Cakes with Rémoulade

So… full disclosure… the recipe is actually Crab Cakes with Snow Pea Slaw. But I didn’t make it with the snow pea slaw so I’m leaving it out of this particular post because it’s a separate recipe. If anyone wants me to post it, I absolutely can, but I haven’t tried it yet.

Now… on to the actual crab cakes. O-M-G… amazing. LOVED them. This will be my go-to recipe for crab cakes going forward. I’ve tried others and they were okay, but I was never super thrilled. Don’t get me wrong, I’ve made them and enjoyed them. But there was never a crab cake recipe that I’ve tried that wow’ed me. This one wow’ed me. Big time… I’ll definitely be making these again, without a doubt.


Okay… so a note about how I customized this to suit my own taste. I pretty much followed this recipe to the letter with the exception of the capers (which I reduced to 1 tablespoon) and I skipped the chives because I’m not a fan.


Ingredients:

Rémoulade
1/2 cup mayonnaise
1 small garlic clove, finely grated
1 1/2 tablespoon capers
1 1/2 tablespoon whole-grain mustard
1 tablespoon ketchup
1 tablespoon finely chopped fresh chives


Crab Cakes
1/4 cup mayonnaise
1 large egg
1 tablespoon fresh lime juice
1 teaspoon Old Bay Seasoning
1/2 teaspoon kosher salt
1/2 cup panko breadcrumbs
8 ounces jumbo lump crabmeat
1 tablespoon extra-virgin olive oil


To make the rémoulade, in a medium bow, whisk together the mayonnaise, garlic, capers, mustard, ketchup, chives, parsley, hot sauce, lime juice, salt, and pepper to taste. Cover with plastic wrap and refrigerate until serving.

To make the crab cakes, in a medium bowl, whisk together the mayonnaise, egg, lime juice, Old Bay, and salt. Add the panko and crabmeat and toss with a fork to combine. Shape the mixture into four patties.

In a large nonstick skillet, heat the oil over medium heat. Fry the crab cakes on both sides until golden brown, 3 to 4 minutes on each side. Transfer each to a plate and serve with rémoulade.

Panfried Salmon with Broccolini and Orange Sauce

I’ve made this dish twice already and I loved it both times. This will definitely become a favorite on the rotation. I love salmon and as much as I enjoy the ways I’ve made it in the past, finding a new way to prepare an old favorite is never a bad thing. And this recipe is so simple and so quick to make that it will definitely become a “go-to” on those nights where I get a late start on dinner but don’t want to go out and grab something or have something delivered.


Ingredients:

8 navel oranges
12 ounces broccolini trimmed
2 tablespoons unsalted butter
2 tablespoons olive oil
Kosher salt and freshly ground black pepper
Four 6-ounce skinless salmon filets


  1. Cut off the tops and bottoms of two oranges. Using a small sharp knife, cut away the peel an white pith from the oranges, following the curve of the oranges form top to bottom. Holding one orange in your hand, and working over a bowl, make 2 cuts along the membranes on either side of a segment, then lift the segment out of the membranes and drop it into the bowl. Repeat to remove all the segments from both oranges. Squeeze the membranes over the bowl to release as much juice as possible and discard them. Pour the accumulated juices into a 2-cup measuring cup; set the segments aside. Squeeze enough juice from the remaining 6 oranges to make 2 cups total juice.
  2. Pour the orange juice into a wide heavy saucepan and boil over medium-high heat for about 10 minutes, or until reduced to 1/2 cup. Remove from the heat and cover to keep warm.
  3. Meanwhile, bring a large saucepan of salted water to a boil over high heat. Add the broccolini and cook for about 2 minutes, or just until it is bright green and tender. Drain and transfer to a bowl of ice water to cool completely. Drain well and pat dry with paper towels.
  4. Heat a large heavy skillet over medium-high heat. Melt 1 tablespoon of the butter with 1 tablespoon of the olive oil in the pan, add the broccolini, and cook, stirring occasionally, for about 5 minutes, or until heated through. Season to taste with salt and pepper.
  5. Meanwhile, sprinkle the salmon fillets with salt and pepper. Heat a large heavy nonstick skillet over medium-high heat. Add the remaining 1 tablespoon olive oil, then add the salmon and cook, turning the salmon over half-way through cooking, for about 3 minutes per side, or until it is mostly opaque, with a rosy center when pierced in the thickest part with the tip of a small knife. Transfer to a platter and let rest for 2 minutes.
  6. Divide the broccolini among four dinner plates and top with the salmon fillets. Whisk the remaining 1 tablespoon butter into the orange juice reduction and drizzle over and around the salmon. Garnish with the orange segments and serve.

Cucumber, Peach, and Feta Salad

The Happy Cook
Daphne Oz

I don’t remember when I bought this book but it’s been a while. So I’m kind of kicking myself that I didn’t browse through it much sooner because there are some really interesting recipes in it. One of which is this salad. It’s light, refreshing, and very tasty. So it’s definitely one I’ll be making again. And best of all, it’s quick and simple so it’s something that can be added as a side dish when you want to switch things up a little bit.

Just a quick note… I pretty much followed this recipe to the letter, with the exception of the chives. Not a fan, so I skipped them. I used to think that not including all the ingredients was an unforgivable sin. But it’s not. We’re allowed to tweak to our own tastes. So I tweaked.


Ingredients:

1 English (seedless) cucumber or 4 Persian (mini) cucumbers sliced into thin rounds
2 peaches, halved, pitted, and thinly sliced
1/4 cup crumbled feta cheese (preferably Belgian or French)
2 tablespoons balsamic vinegar
1 small garlic clove, grated on a microplane-style rasp
1 teaspoon grainy mustard
1 teaspoon honey
3/4 teaspoon kosher salt
Freshly cracked black pepper
3 tablespoons extra-virgin olive oil
1/4 cup fresh chives


On a platter, alternate slices of cucumber and peaches. Crumble the feta over the top.

In a small bowl, whisk together the vinegar, garlic, mustard, honey, salt, and pepper to taste. While whisking, slowly drizzle in the olive oil until the dressing is creamy and emulsified.

Drizzle the dressing over the salad and service sprinkled with the chives.


Two variations were included at the bottom of the recipe:

Variation #1:
In the winter you can make this salad with grapes instead of peaches.

Variation #2:
Feta cheese can have a very assertive, salty flavor. If you prefer a more mellow flavor, you can substitute ricotta salata or goat cheese.

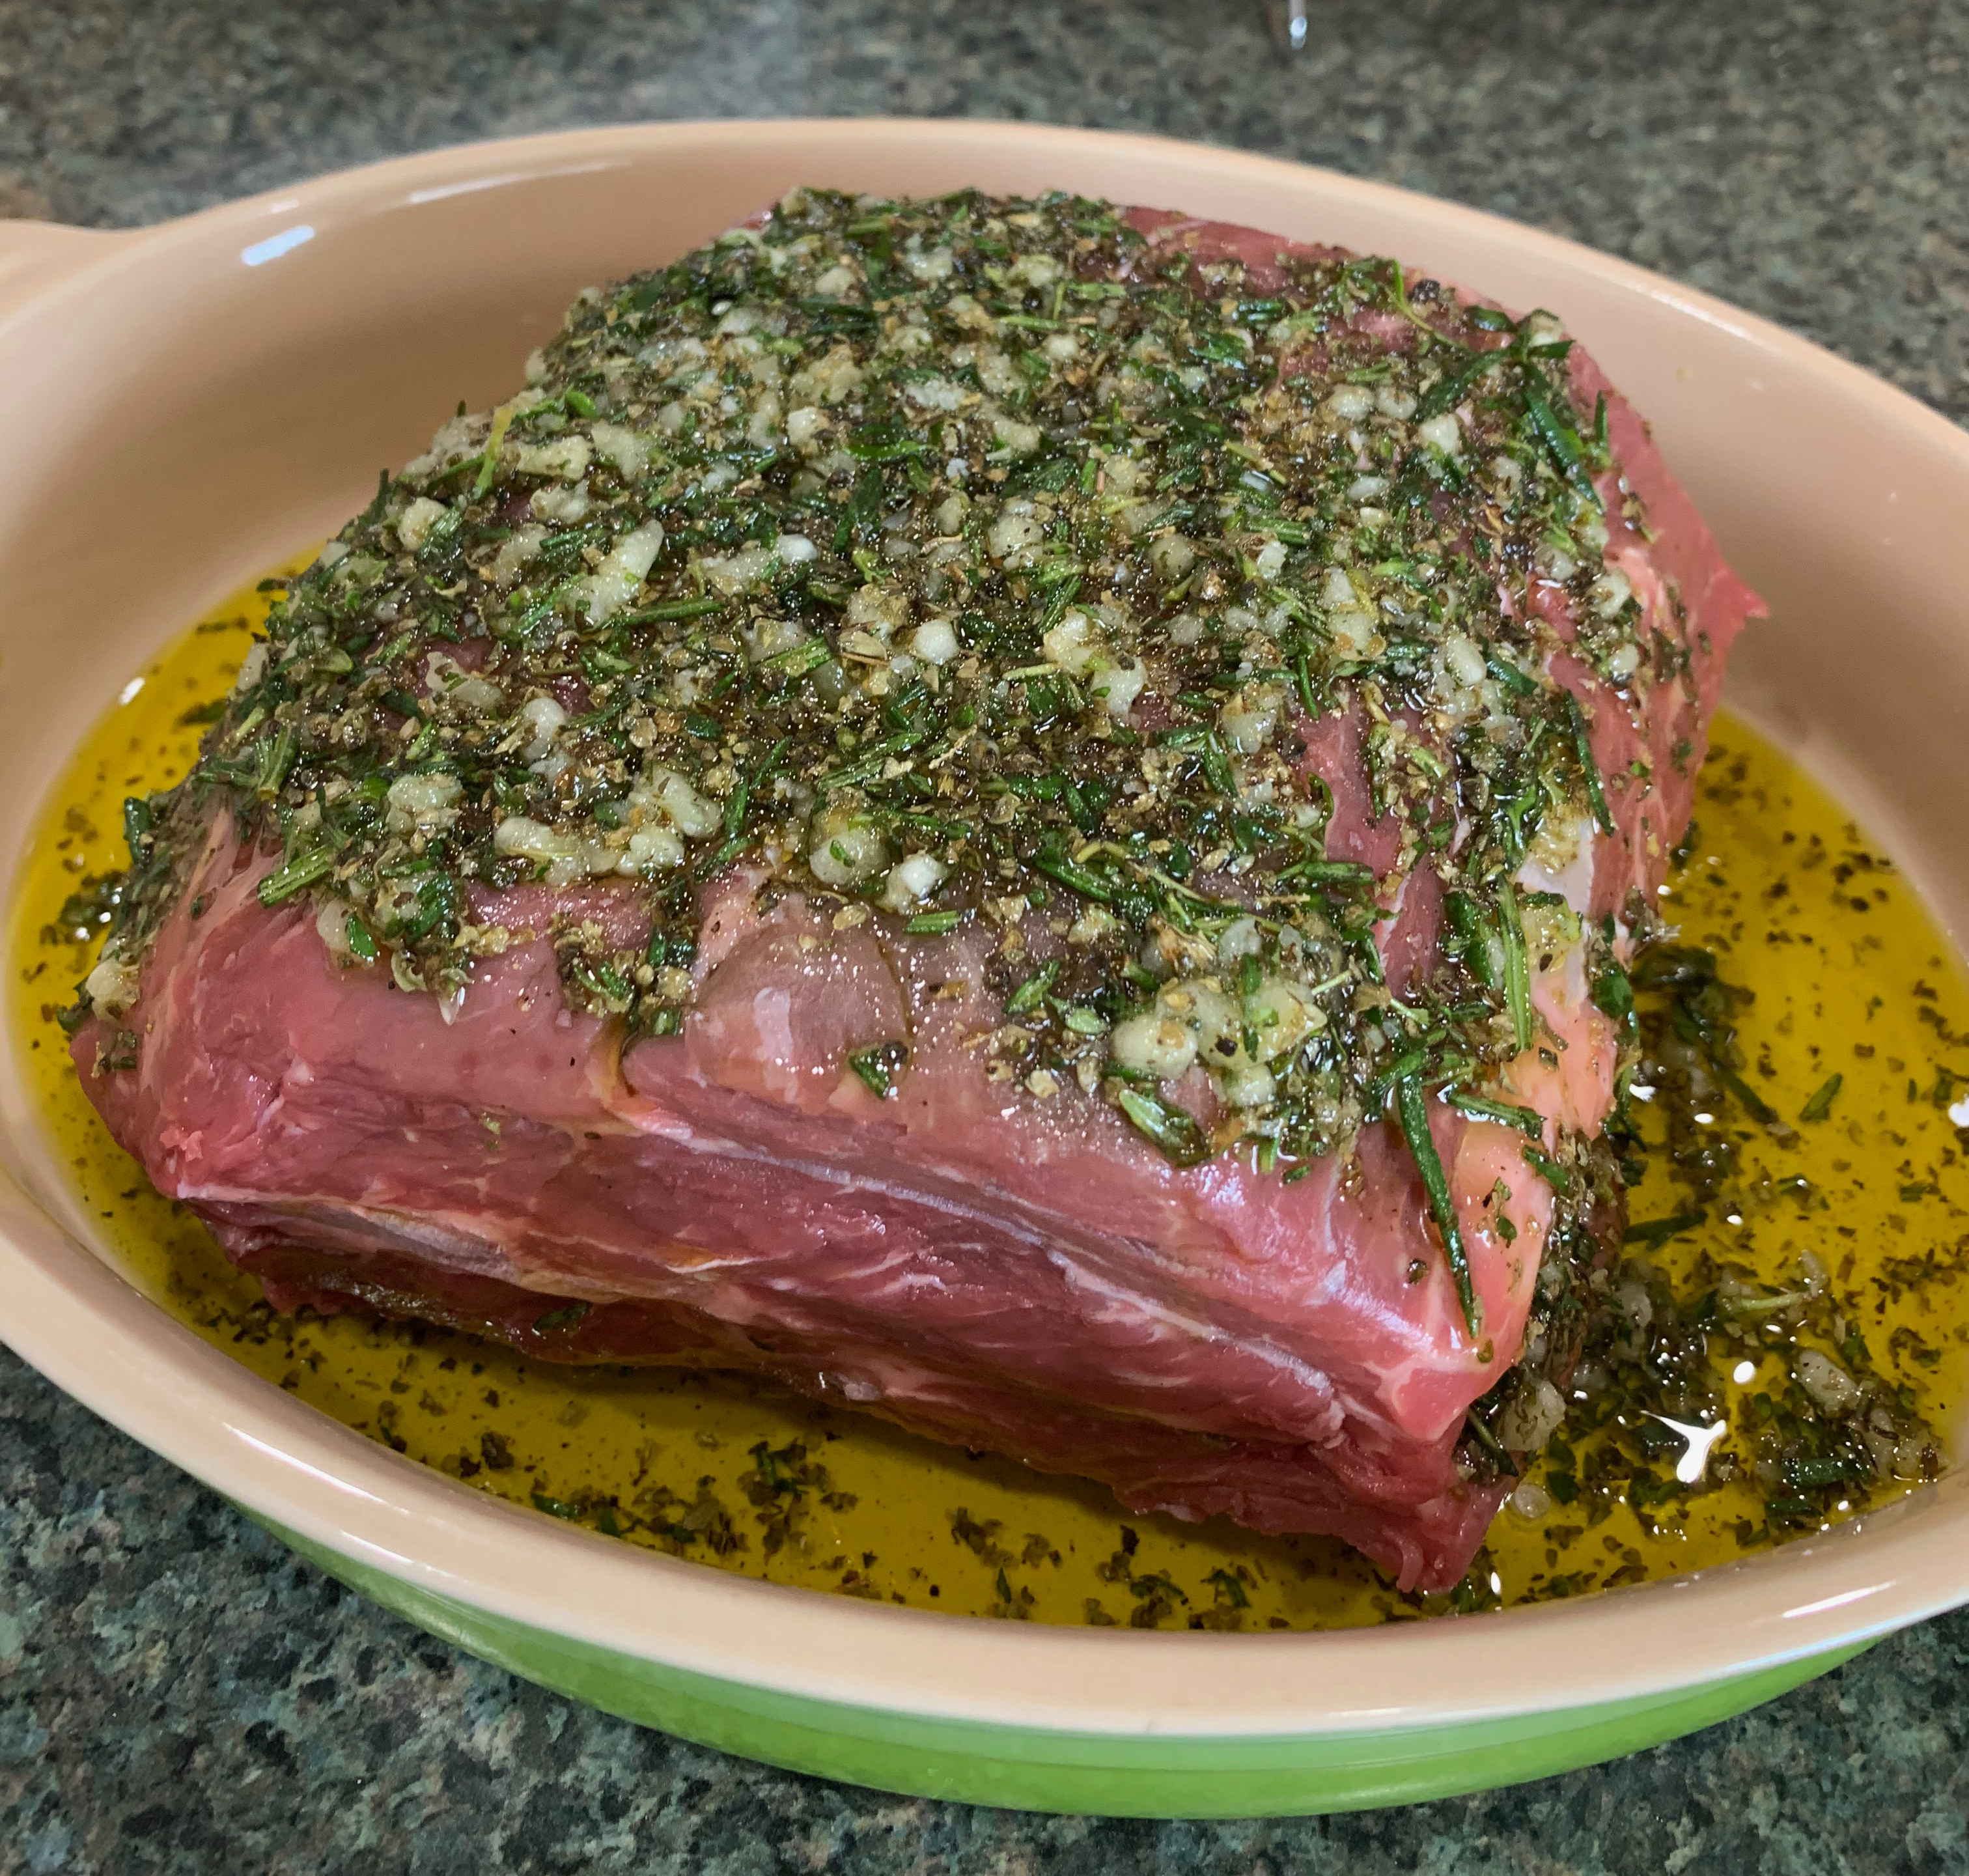
Arrosto di manzo alle erbe (Roast beef with herbs)

Gennaro Slow Cook Italian
Gennaro Contaldo

I’ve had this book for quite some time and kind of forgot about it.  I’ve been in a rut lately and getting tired of making the same old stuff so I just started pulling out books and leafing through them to see if something jumped out at me.  This recipe (along with a number of others from this book) really caught my attention.  So I think it’s safe to say that I’ll be pulling this one out more often.

As for the recipe itself, it did not disappoint.  It’s such a simple recipe that really packs a ton of flavor. The meat was tender and the overall taste was amazing.  I thought all those herbs might make it a little overpowering but that wasn’t the case at all.  I really enjoyed the blend of favors and will definitely be making it again.  Just a couple of quick notes…  I didn’t have any parsley so I skipped it (and didn’t miss it), and used dried marjoram as opposed to fresh.  Also, the roast I had was just over 2 lbs so I adjusted the cooking time accordingly.


Ingredients:

2 carrots, sliced lengthwise
1 top round roast (3 lb approx.)
½ cup extra virgin olive oil
3 garlic cloves, finely chopped
needles from 3 sprigs of rosemary, finely chopped
small bunch of thyme, finely chopped
2 tbsp marjoram, finely chopped
a handful of parsley, finely chopped
salt and freshly ground black pepper


Preheat the oven to 400ºF

Put the carrots in a roasting pan and place the beef on top (this prevents the meat from sticking to the pan).

Combine the olive oil, garlic, herbs, salt and pepper and pour over the meat, rubbing well.

Roast in the oven for 20 minutes, then cover with foil and continue to roast for another 1¼ hours, turning the meat over after 30 minutes.

Remove from the oven and leave to rest for 10 minutes.  Slice and serve.


IMG_2484

Weeknight Salmon with Baby New Potatoes and Fresh Dill

Magnolia Table – Volume 2
Joanne Gaines

Once again, I wanted to try this recipe for a new twist on an old favorite.  We love salmon in our house.  But sometimes you need to switch things up and cook an old favorite in a different way.  It was good and we definitely enjoyed it.  But it needed a little more *oomph* for my liking.  So next time I might play around with a few of the ingredients and see if that works.


Ingredients:

1 pound baby new potatoes, quartered
2 tablespoons olive oil
1 teaspoon garlic salt
1 teaspoon kosher salt
1 teaspoon freshly ground black pepper
1 teaspoon paprika
1 teaspoon onion powder
4 skin-on salmon filets, 1½ inches thick (about 8 ounces each)
3 tablespoons unsalted butter, melted
2 Meyer lemons
1 tablespoon chopped fresh dill
1 tablespoon chopped fresh parsley


IMG_1974


  1. Preheat the oven to 425ºF.
  2. In a large bowl, toss together the potatoes, olive oil, and ½ teaspoon each of the garlic salt and kosher salt.  Arrange the potatoes on one end of a nonstick sheet pan or a sheet pan lined with foil.
  3. Roast until the potatoes are tender and golden on the bottom, about 15 minutes, turning them once with a spatula during cooking.
  4. Meanwhile, in a small bowl, mix together the pepper, paprika, onion powder, and remaining ½ teaspoon each garlic salt and kosher salt.
  5. Cut two 1-inch long, ¼-inch-deep slits in the fleshy side of each fillet for the butter and seasonings to seep in.  Place the salmon fillets on the empty side of the sheet pan, skid side down.  Drizzle the melted butter over the salmon and potatoes.  Sprinkle the spice mixture over the top.  Cut a lemon in half and squeeze both halves over the entire sheet pan, capturing the seeds in your hand.
  6. Bake until the salmon flakes with a fork, 10 to 12 minutes.
  7. Cut the remaining lemon into 4 wedges. Sprinkle the salmon and potatoes with the dill and parsley and serve with lemon wedges.
  8. Store in an airtight container in the refrigerator for 1 to 3 days.


So how would I tweak this?  Maybe a little more salt and some fresh garlic instead of garlic salt.  Then I might try a little more lemon fresh squeezed lemon juice.  All in all, it was good, but for my tastes, it needs a little more… but don’t let me stop you from trying it!

Honey Garlic Chicken with Pineapple

Magnolia Table – Volume 2
Joanna Gaines

Okay…  so thoughts on this bad boy… I’ve got a few.  It was good.  Don’t get me wrong.  It was different and I loved the mix of flavors, but for me it was too much of a good thing.  So I’ll definitely make this again, for sure.  But there will just be less of it.  I think the flavors were so intense that it took away from the chicken.  So… for this recipe, I’m going to operate on the “less is more” mindset.


Ingredients:

½ cup apple cider vinegar
½ cup honey
1 cup ketchup
4 tablespoons (½ stick) of butter, melted
2 teaspoons garlic salt
2 garlic cloves, minced
8 boneless, skinless chicken thighs (about 4 ounces each)
1 tablespoon vegetable oil
½ teaspoon kosher salt
½ teaspoon freshly ground pepper
2 cups cubed (1-inch) fresh pineapple
1½ cups red bell pepper strips (about 2 large)
1 tablespoon minced fresh parsley
1 tablespoon toasted sesame seeds
Cooked rice, for serving


IMG_1989


  1. Position an oven rack 6 inches from the broiler element and preheat the oven to 400ºF.
  2. In a medium bowl, whisk together the vinegar, honey, ketchup, melted butter, garlic salt, and garlic until well combined.
  3. Place the chicken thighs on one side of a sheet pan and pat them dry. Drizzle with the oil and sprinkle with the salt and pepper. Bake for 15 minutes.
  4. Remove from the oven and place the pineapple and bell peppers on the other end of the pan.  Baste the chicken thighs with ½ cup of the sauce and bake for 10 minutes.
  5. Turn the oven to broil (do not remove the pan) and broil until the chicken is charred in several places, 8 to 10 minutes.
  6. Transfer the chicken, pineapple, and peppers to a large bowl and toss with ½ cup of the remaining sauce.
  7. Top with fresh parsley and sesame seeds.  Serve over rice with the remaining sauce on the side.
  8. Store in an airtight container in the refrigerator for 3 to 5 days.

Okay…  a few notes on how I would tweak this recipe for next time:

Let’s start with the “less is more” thing… 
The next time I make this, I’m cutting the cider, honey and ketchup in half.  The pineapple in it is sweet. So the honey makes adds unnecessary sweetness. The cider vinegar is strong, and the ketchup is just too much.  I’m going on the assumption that by halving those three ingredients, it’ll make the flavor more subtle and tone it down.  The way it’s written works but it’s just a little strong for my preference. So when I make this again, I’m going to try it with less.  Also, while the recipe calls for boneless skinless thighs, I had a pack of wings in the fridge and threw those in too.  😊

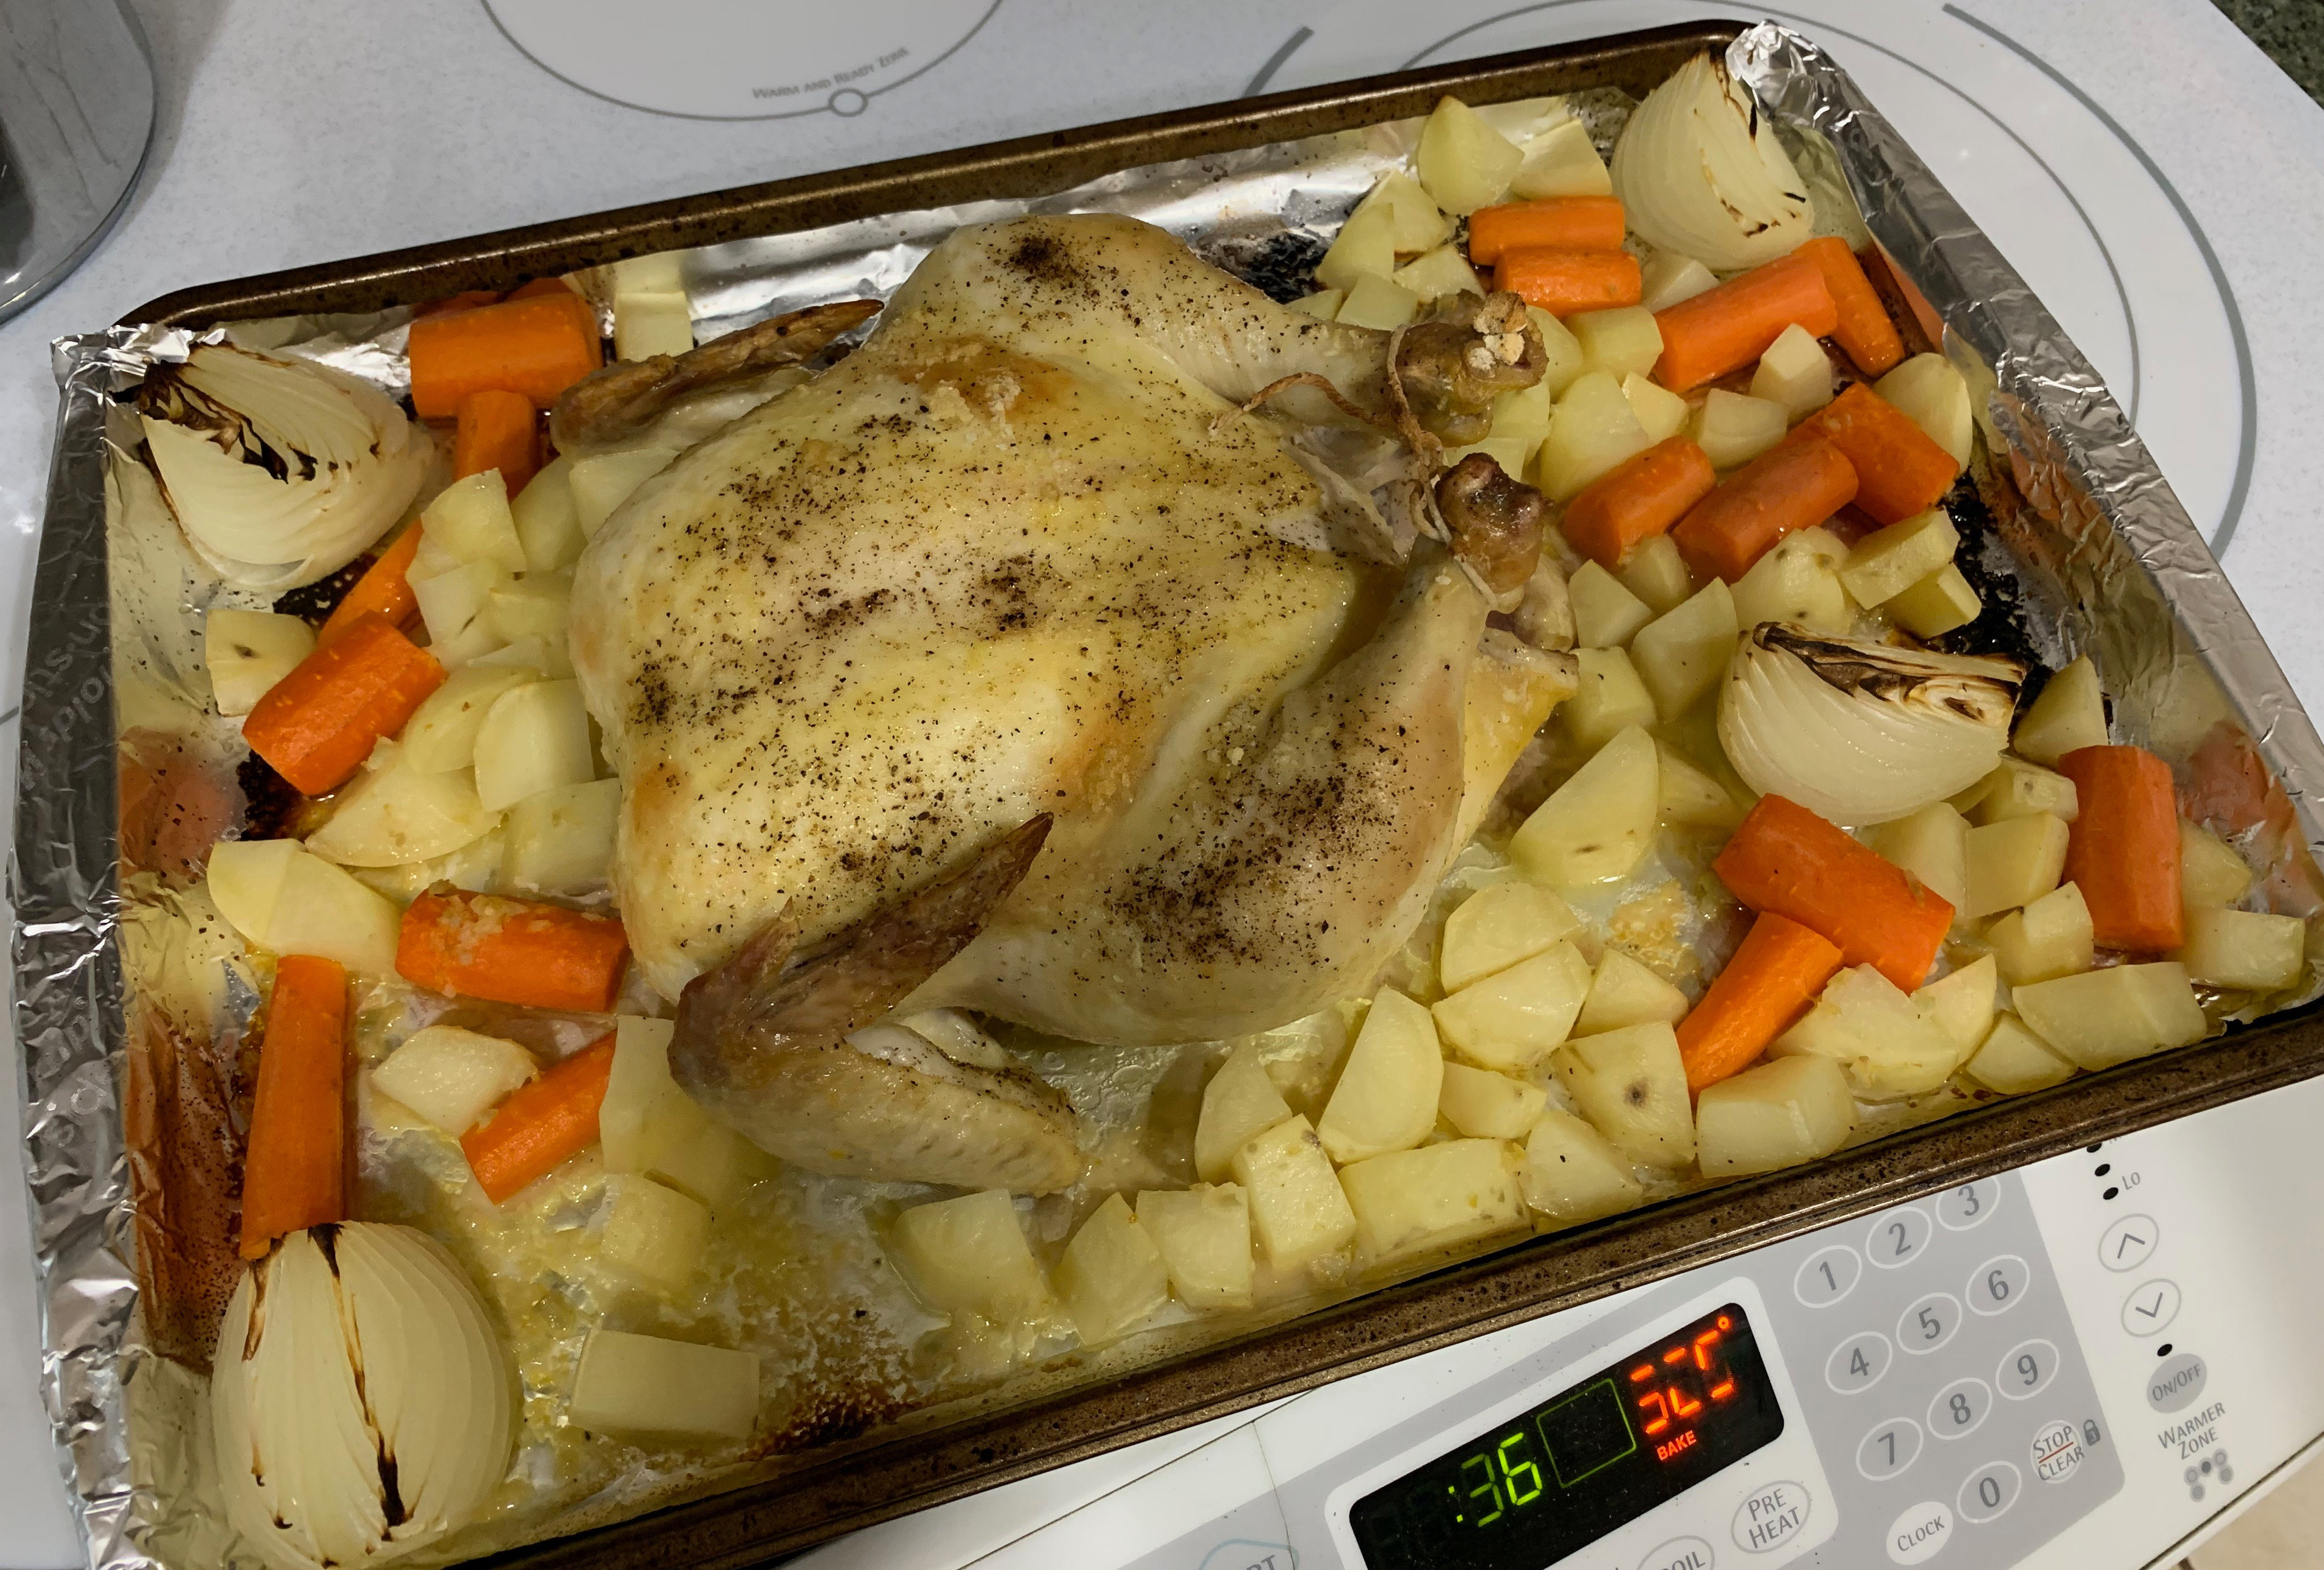
Whole Roasted Chicken

Magnolia Table – Volume 2
Joanna Gaines

I decided to make this just to try a different roasted chicken recipe.  It’s no secret that I love chicken.  I could eat it every day.  And while I love the Fabio’s recipe that I make all the time, every once in a while it’s nice to switch things up.  And this one caught my attention enough to try it and I liked it enough that I’ll probably make it again.  Basically, it’s a nice option to add to the chicken rotation.  Although next time I think I’ll use less vegetables, if for no other reason than the quantity was too much for 3 people.  So a little less on the vegetables would just work better for us.  However, if you’re a fan of lots of veggies, have at it.  I’m a firm believer that recipes are made to be tweaked.  So do what works for you.

Something else I will add is to use the cooking times as estimates.  All ovens are different so cooking times will never be exact.  So if it doesn’t look right, it’s okay to adjust on the fly.  And while the chicken was definitely full cooked, I think next time I will leave it in a little longer so it browns a little more. So there are my takes on this recipe.


Ingredients

One 4-ound whole chicken
1 tablespoon olive oil
1½ teaspoons kosher salt
¾ teaspoon coarsely ground black pepper
1½ pounds baby potato medley or tricolored baby potatoes
6 large tricolored carrots, trimmed and cut into thirds, or 4 cups baby carrots*
1 medium yellow onion, quartered
4 tablespoons (½ stick) unsalted butter
¼ cup good-quality dry white wine
2 garlic cloves, chopped
Grated zest of 1 lemon
1 tablespoon fresh lemon juice
1 teaspoon garlic salt
1 bunch broccolini or 1 broccoli head, cut into 1-inch florets
1 tablespoon minced fresh parsley

I couldn’t find tricolored carrots and didn’t want to use baby carrots so
  I just used regular carrots.  Don’t call the carrot police on me.  


  1. Preheat the over to 425ºF
  2. Tie the legs of the chicken together with kitchen string. Place the chicken in the center of a sheet pan. Rub the skin with oil and sprinkle evenly with the salt and pepper. Arrange the potatoes, carrots, and onion quarters around the chicken.
    IMG_1959
  3. In the small saucepan, melt the butter over medium heat, stir in the wine, garlic, lemon zest, lemon juice, and garlic salt and cook for 1 minute. Drizzle half the wine sauce over the vegetables, tossing the coat.
  4. Bake for 35 minutes. Reduce the over temperature to 325ºF, add the broccolini to the pan, and bake until an instant-read thermometer inserted into the thick thigh registers 165ºF, 40 to 45 minutes. Baste the chicken with the remaining wine sauce in the last 10 minutes of cooking.
    IMG_1960
  5. Remove the pan from the oven, tent the chicken and vegetables with foil, and let it sit for 15 minutes. Cut the chicken into slices to serve, or serve family style, cutting the chicken into 8 pieces.
  6. Sprinkle the vegetables with the parsley.


IMG_1958
Before
IMG_1961
After

Pancetta Wrapped Pork Roast

Giada’s Family Dinners
Giada de Laurentis


I have made this dish 2 or 3 times in the last couple of months, and I have to say… it doesn’t disappoint.  It’s pretty easy to make and the leftovers taste even better.  Even cold, out of the fridge.  And I know this, because I’ve eaten it cold, out of the fridge.  And here’s the best part, for those of you unfamiliar with pancetta (which is essentially an Italian version of bacon), or aren’t a fan, you can substitute bacon!  And who doesn’t love bacon.  In fact, whenever I’ve made it, I’ve used bacon.  Because while I don’t dislike pancetta, it’s not huge on my hit parade, and I like bacon better.  So… no brainer!  Bacon wins!  Oh, and by the way, the recipe calls for 6 ounces of bacon, I usually use the full pound of the stuff depending on how long the loin is.  Because, you know…  everything is better with bacon! So it stands to reason, more bacon is better! 😁


Ingredients

10 large garlic cloves
1½ tablespoons finely chopped fresh thyme
1 tablespoon finely chopped fresh rosemary
1 tablespoon olive oil
1 (4½- to 5-pound) boneless pork loin roast
Salt and freshly ground black pepper
6 ounces thinly sliced pancetta or bacon
2 cups reduced-sodium chicken broth
2 cups dry white wine


In a small food processor, blend the garlic, thyme, rosemary, and oil, scraping down the sides of the bowl occasionally, until the garlic is minced.

Open the pork roast to separate the 2 pork loins.  Sprinkle the pork generously with salt and pepper.  Arrange the pancetta (bacon) slices on a work surface, overlapping slightly to form a rectangle.  Spread a fourth of the garlic mixture over the flat side of one pork loin, then top with the remaining pork loin, flat side down, to reform the pork roast.  Using kitchen twine, tie the pork roast to secure the loin in place.  Spread the remaining garlic mixture over the surface of the pork and place it on top of the pancetta (bacon).  Wrap the pancetta (bacon) slices around the pork to cover and completely as possible.  Place the pork in a roasting pan.  Cover and refrigerate for at least one hour and up to 24 hours.

uRjsIHuWSBieRwfjrFzE+Q

44PioOuBS6yiAJNcc08f+w

Preheat oven to 450°F.  Pour ¾ cup of the broth and ¾ cup of the wine into the toasting pan.  Roast the pork, adding more broth and wine to the pan juices every 20 minutes, until a meat thermometer inserted into the center registers 135°F for medium-rare, about 1 hour and 15 minutes.  Transfer the pork to a cutting board.  Tent with aluminum foil and let stand for 10 minutes.  Pour the pan drippings into a glass measuring cup and spoon off any fat that rises to the top.

Using a large sharp carving knife, cut the port into ¼-inch-thick slices, then serve with the pan juices.